OpenLDAP2.4管理员指南
小 (→LDAP同步复制) |
|||
| 第4行: | 第4行: | ||
'''本文的英文原文来自[http://www.openldap.org/doc/admin24/index.html OpenLDAP Software 2.4 Administrator's Guide]''' | '''本文的英文原文来自[http://www.openldap.org/doc/admin24/index.html OpenLDAP Software 2.4 Administrator's Guide]''' | ||
| − | + | 先翻译快速开始指南和目录复制。 | |
| + | |||
| + | ==快速开始指南== | ||
| + | |||
| + | 以下是一个OpenLDAP2.4的快速开始指南, 包含独立的LDAP守护进程, slapd(8). | ||
| + | |||
| + | 这表示带你走过安装和配置OpenLDAP软件所需要的基本步骤. 应该结合其它文档一起来看,包括本文的其他章节,手册页面,以及其随同软件提供的材料(例如INSTALL文档)或OpenLDAP网站(http://www.OpenLDAP.org),特别是OpenLDAP的常见问题解答(http://www.OpenLDAP.org/faq/?file=2)。 | ||
| + | |||
| + | 如果你打算严肃使用OpenLDAP软件, 你应该在尝试安装软件之前阅读本文的全文. | ||
| + | |||
| + | 注意: 这个快速开始指南没有使用强验证或任何保密服务. 这些服务在本OpenLDAP管理员指南的其它章节里有所描述. | ||
| + | |||
| + | :1. 获得软件 | ||
| + | ::你可以跟着OpenLDAP软件下载页面(http://www.openldap.org/software/download/)的提示获得一份软件拷贝. 建议新用户使用最新版本. | ||
| + | |||
| + | :2. 解包分发版 | ||
| + | ::给源码选择一个目录, 进入到那个目录, 使用以下命令解包分发版: | ||
| + | <source lang="bash"> | ||
| + | gunzip -c openldap-VERSION.tgz | tar xvfB - | ||
| + | </source> | ||
| + | ::然后进入分发版的目录: | ||
| + | <source lang="bash"> | ||
| + | cd openldap-VERSION | ||
| + | </source> | ||
| + | ::你要把VERSION换成相应的版本名. | ||
| + | |||
| + | :3. 阅读文档 | ||
| + | ::你现在应该阅读分发版所提供的COPYRIGHT, LICENSE, README 和 INSTALL 文档. COPYRIGHT 和 LICENSE 提供的信息是关于可接受的使用,拷贝方式和OpenLDAP软件的有限保证. | ||
| + | |||
| + | ::你也应该阅读本文的其他章节. 特别是, 本文的编译和安装OpenLDAP软件章节提供了依赖的软件的详细信息和安装过程. | ||
| + | |||
| + | :4. 运行configure | ||
| + | ::你将需要运行提供的configure脚本来配置分发版使它能在你的系统上进行编译. configure脚本接受很多命令行选项以打开或关闭可选的软件功能. 通常缺省就差不多了, but you may want to change them. To get a complete list of options that configure accepts, use the --help option: | ||
| + | ./configure --help | ||
| + | However, given that you are using this guide, we'll assume you are brave enough to just let configure determine what's best: | ||
| + | ./configure | ||
| + | Assuming configure doesn't dislike your system, you can proceed with building the software. If configure did complain, well, you'll likely need to go to the Software FAQ Installation section (http://www.openldap.org/faq/?file=8) and/or actually read the Building and Installing OpenLDAP Software chapter of this document. | ||
| + | |||
| + | :5. Build软件. | ||
| + | The next step is to build the software. This step has two parts, first we construct dependencies and then we compile the software: | ||
| + | make depend | ||
| + | make | ||
| + | Both makes should complete without error. | ||
| + | |||
| + | :6. 测试build. | ||
| + | To ensure a correct build, you should run the test suite (it only takes a few minutes): | ||
| + | make test | ||
| + | Tests which apply to your configuration will run and they should pass. Some tests, such as the replication test, may be skipped. | ||
| + | |||
| + | :7. 安装软件. | ||
| + | You are now ready to install the software; this usually requires super-user privileges: | ||
| + | su root -c 'make install' | ||
| + | Everything should now be installed under /usr/local (or whatever installation prefix was used by configure). | ||
| + | |||
| + | :8. 编辑配置文件. | ||
| + | Use your favorite editor to edit the provided slapd.conf(5) example (usually installed as /usr/local/etc/openldap/slapd.conf) to contain a BDB database definition of the form: | ||
| + | database bdb | ||
| + | suffix "dc=<MY-DOMAIN>,dc=<COM>" | ||
| + | rootdn "cn=Manager,dc=<MY-DOMAIN>,dc=<COM>" | ||
| + | rootpw secret | ||
| + | directory /usr/local/var/openldap-data | ||
| + | Be sure to replace <MY-DOMAIN> and <COM> with the appropriate domain components of your domain name. For example, for example.com, use: | ||
| + | database bdb | ||
| + | suffix "dc=example,dc=com" | ||
| + | rootdn "cn=Manager,dc=example,dc=com" | ||
| + | rootpw secret | ||
| + | directory /usr/local/var/openldap-data | ||
| + | If your domain contains additional components, such as eng.uni.edu.eu, use: | ||
| + | database bdb | ||
| + | suffix "dc=eng,dc=uni,dc=edu,dc=eu" | ||
| + | rootdn "cn=Manager,dc=eng,dc=uni,dc=edu,dc=eu" | ||
| + | rootpw secret | ||
| + | directory /usr/local/var/openldap-data | ||
| + | Details regarding configuring slapd(8) can be found in the slapd.conf(5) manual page and the The slapd Configuration File chapter of this document. Note that the specified directory must exist prior to starting slapd(8). | ||
| + | |||
| + | :9. 启动SLAPD. | ||
| + | You are now ready to start the Standalone LDAP Daemon, slapd(8), by running the command: | ||
| + | su root -c /usr/local/libexec/slapd | ||
| + | To check to see if the server is running and configured correctly, you can run a search against it with ldapsearch(1). By default, ldapsearch is installed as /usr/local/bin/ldapsearch: | ||
| + | ldapsearch -x -b '' -s base '(objectclass=*)' namingContexts | ||
| + | Note the use of single quotes around command parameters to prevent special characters from being interpreted by the shell. This should return: | ||
| + | dn: | ||
| + | namingContexts: dc=example,dc=com | ||
| + | Details regarding running slapd(8) can be found in the slapd(8) manual page and the Running slapd chapter of this document. | ||
| + | |||
| + | :10. 添加初始条目到目录中去. | ||
| + | You can use ldapadd(1) to add entries to your LDAP directory. ldapadd expects input in LDIF form. We'll do it in two steps: | ||
| + | 1. create an LDIF file | ||
| + | 2. run ldapadd | ||
| + | |||
| + | Use your favorite editor and create an LDIF file that contains: | ||
| + | dn: dc=<MY-DOMAIN>,dc=<COM> | ||
| + | objectclass: dcObject | ||
| + | objectclass: organization | ||
| + | o: <MY ORGANIZATION> | ||
| + | dc: <MY-DOMAIN> | ||
| + | |||
| + | dn: cn=Manager,dc=<MY-DOMAIN>,dc=<COM> | ||
| + | objectclass: organizationalRole | ||
| + | cn: Manager | ||
| + | Be sure to replace <MY-DOMAIN> and <COM> with the appropriate domain components of your domain name. <MY ORGANIZATION> should be replaced with the name of your organization. When you cut and paste, be sure to trim any leading and trailing whitespace from the example. | ||
| + | dn: dc=example,dc=com | ||
| + | objectclass: dcObject | ||
| + | objectclass: organization | ||
| + | o: Example Company | ||
| + | dc: example | ||
| + | |||
| + | dn: cn=Manager,dc=example,dc=com | ||
| + | objectclass: organizationalRole | ||
| + | cn: Manager | ||
| + | Now, you may run ldapadd(1) to insert these entries into your directory. | ||
| + | ldapadd -x -D "cn=Manager,dc=<MY-DOMAIN>,dc=<COM>" -W -f example.ldif | ||
| + | Be sure to replace <MY-DOMAIN> and <COM> with the appropriate domain components of your domain name. You will be prompted for the "secret" specified in slapd.conf. For example, for example.com, use: | ||
| + | ldapadd -x -D "cn=Manager,dc=example,dc=com" -W -f example.ldif | ||
| + | where example.ldif is the file you created above. | ||
| + | |||
| + | Additional information regarding directory creation can be found in the Database Creation and Maintenance Tools chapter of this document. | ||
| + | |||
| + | :11. 看它是否起作用. | ||
| + | Now we're ready to verify the added entries are in your directory. You can use any LDAP client to do this, but our example uses the ldapsearch(1) tool. Remember to replace dc=example,dc=com with the correct values for your site: | ||
| + | ldapsearch -x -b 'dc=example,dc=com' '(objectclass=*)' | ||
| + | This command will search for and retrieve every entry in the database. | ||
| + | |||
| + | 现在你准备使用ldapadd(1)或其它LDAP客户端添加更多的条目, 试验更多的配置选项, 后端安排, 等等. | ||
| + | |||
| + | 注意缺省的情况下, slapd(8)数据库赋予阅读权限给每个人,除了超级用户(即配置文件中的rootdn参数). 强烈建议你建立控制来限制授权用户的操作. 操作权限控制在 访问控制 章讨论. 也鼓励你阅读安全事项,使用SASL和使用TLS章节. | ||
| + | |||
| + | The following chapters provide more detailed information on making, installing, and running slapd(8). | ||
| + | |||
| + | |||
==复制== | ==复制== | ||
2009年4月16日 (四) 04:25的版本
本文的英文原文来自OpenLDAP Software 2.4 Administrator's Guide
先翻译快速开始指南和目录复制。
目录 |
快速开始指南
以下是一个OpenLDAP2.4的快速开始指南, 包含独立的LDAP守护进程, slapd(8).
这表示带你走过安装和配置OpenLDAP软件所需要的基本步骤. 应该结合其它文档一起来看,包括本文的其他章节,手册页面,以及其随同软件提供的材料(例如INSTALL文档)或OpenLDAP网站(http://www.OpenLDAP.org),特别是OpenLDAP的常见问题解答(http://www.OpenLDAP.org/faq/?file=2)。
如果你打算严肃使用OpenLDAP软件, 你应该在尝试安装软件之前阅读本文的全文.
注意: 这个快速开始指南没有使用强验证或任何保密服务. 这些服务在本OpenLDAP管理员指南的其它章节里有所描述.
- 1. 获得软件
- 你可以跟着OpenLDAP软件下载页面(http://www.openldap.org/software/download/)的提示获得一份软件拷贝. 建议新用户使用最新版本.
- 2. 解包分发版
- 给源码选择一个目录, 进入到那个目录, 使用以下命令解包分发版:
gunzip -c openldap-VERSION.tgz | tar xvfB -
- 然后进入分发版的目录:
cd openldap-VERSION- 你要把VERSION换成相应的版本名.
- 3. 阅读文档
- 你现在应该阅读分发版所提供的COPYRIGHT, LICENSE, README 和 INSTALL 文档. COPYRIGHT 和 LICENSE 提供的信息是关于可接受的使用,拷贝方式和OpenLDAP软件的有限保证.
- 你也应该阅读本文的其他章节. 特别是, 本文的编译和安装OpenLDAP软件章节提供了依赖的软件的详细信息和安装过程.
- 4. 运行configure
- 你将需要运行提供的configure脚本来配置分发版使它能在你的系统上进行编译. configure脚本接受很多命令行选项以打开或关闭可选的软件功能. 通常缺省就差不多了, but you may want to change them. To get a complete list of options that configure accepts, use the --help option:
           ./configure --help
     However, given that you are using this guide, we'll assume you are brave enough to just let configure determine what's best:
           ./configure
     Assuming configure doesn't dislike your system, you can proceed with building the software. If configure did complain, well, you'll likely need to go to the Software FAQ Installation section (http://www.openldap.org/faq/?file=8) and/or actually read the Building and Installing OpenLDAP Software chapter of this document.
- 5. Build软件.
     The next step is to build the software. This step has two parts, first we construct dependencies and then we compile the software:
           make depend
           make
     Both makes should complete without error.
- 6. 测试build.
     To ensure a correct build, you should run the test suite (it only takes a few minutes):
           make test
     Tests which apply to your configuration will run and they should pass. Some tests, such as the replication test, may be skipped.
- 7. 安装软件.
     You are now ready to install the software; this usually requires super-user privileges:
           su root -c 'make install'
     Everything should now be installed under /usr/local (or whatever installation prefix was used by configure).
- 8. 编辑配置文件.
     Use your favorite editor to edit the provided slapd.conf(5) example (usually installed as /usr/local/etc/openldap/slapd.conf) to contain a BDB database definition of the form:
           database bdb
           suffix "dc=<MY-DOMAIN>,dc=<COM>"
           rootdn "cn=Manager,dc=<MY-DOMAIN>,dc=<COM>"
           rootpw secret
           directory /usr/local/var/openldap-data
     Be sure to replace <MY-DOMAIN> and <COM> with the appropriate domain components of your domain name. For example, for example.com, use:
           database bdb
           suffix "dc=example,dc=com"
           rootdn "cn=Manager,dc=example,dc=com"
           rootpw secret
           directory /usr/local/var/openldap-data
     If your domain contains additional components, such as eng.uni.edu.eu, use:
           database bdb
           suffix "dc=eng,dc=uni,dc=edu,dc=eu"
           rootdn "cn=Manager,dc=eng,dc=uni,dc=edu,dc=eu"
           rootpw secret
           directory /usr/local/var/openldap-data
     Details regarding configuring slapd(8) can be found in the slapd.conf(5) manual page and the The slapd Configuration File chapter of this document. Note that the specified directory must exist prior to starting slapd(8).
- 9. 启动SLAPD.
     You are now ready to start the Standalone LDAP Daemon, slapd(8), by running the command:
           su root -c /usr/local/libexec/slapd
     To check to see if the server is running and configured correctly, you can run a search against it with ldapsearch(1). By default, ldapsearch is installed as /usr/local/bin/ldapsearch:
           ldapsearch -x -b  -s base '(objectclass=*)' namingContexts
     Note the use of single quotes around command parameters to prevent special characters from being interpreted by the shell. This should return:
           dn:
           namingContexts: dc=example,dc=com
     Details regarding running slapd(8) can be found in the slapd(8) manual page and the Running slapd chapter of this document.
- 10. 添加初始条目到目录中去.
     You can use ldapadd(1) to add entries to your LDAP directory. ldapadd expects input in LDIF form. We'll do it in two steps:
        1. create an LDIF file
        2. run ldapadd
     Use your favorite editor and create an LDIF file that contains:
           dn: dc=<MY-DOMAIN>,dc=<COM>
           objectclass: dcObject
           objectclass: organization
           o: <MY ORGANIZATION>
           dc: <MY-DOMAIN>
           dn: cn=Manager,dc=<MY-DOMAIN>,dc=<COM>
           objectclass: organizationalRole
           cn: Manager
     Be sure to replace <MY-DOMAIN> and <COM> with the appropriate domain components of your domain name. <MY ORGANIZATION> should be replaced with the name of your organization. When you cut and paste, be sure to trim any leading and trailing whitespace from the example.
           dn: dc=example,dc=com
           objectclass: dcObject
           objectclass: organization
           o: Example Company
           dc: example
           dn: cn=Manager,dc=example,dc=com
           objectclass: organizationalRole
           cn: Manager
     Now, you may run ldapadd(1) to insert these entries into your directory.
           ldapadd -x -D "cn=Manager,dc=<MY-DOMAIN>,dc=<COM>" -W -f example.ldif
     Be sure to replace <MY-DOMAIN> and <COM> with the appropriate domain components of your domain name. You will be prompted for the "secret" specified in slapd.conf. For example, for example.com, use:
           ldapadd -x -D "cn=Manager,dc=example,dc=com" -W -f example.ldif
     where example.ldif is the file you created above.
Additional information regarding directory creation can be found in the Database Creation and Maintenance Tools chapter of this document.
- 11. 看它是否起作用.
     Now we're ready to verify the added entries are in your directory. You can use any LDAP client to do this, but our example uses the ldapsearch(1) tool. Remember to replace dc=example,dc=com with the correct values for your site:
           ldapsearch -x -b 'dc=example,dc=com' '(objectclass=*)'
     This command will search for and retrieve every entry in the database.
现在你准备使用ldapadd(1)或其它LDAP客户端添加更多的条目, 试验更多的配置选项, 后端安排, 等等.
注意缺省的情况下, slapd(8)数据库赋予阅读权限给每个人,除了超级用户(即配置文件中的rootdn参数). 强烈建议你建立控制来限制授权用户的操作. 操作权限控制在 访问控制 章讨论. 也鼓励你阅读安全事项,使用SASL和使用TLS章节.
The following chapters provide more detailed information on making, installing, and running slapd(8).
复制
为了提供一个有弹性的企业部署,复制目录是一个基础需求.
OpenLDAP有多种配置选项来建立一个可复制的目录. 在前一个版本里面, 复制被限定在一个主服务器和若干个从服务器的条件下来讨论。一个主服务器从其他客户端接受目录更新, 而一个从服务器则仅仅从一个(单个的)主服务器接受更新. 这个复制结构被僵化地定义并且任何典型的数据库只能完成一个单一角色,主或者从.
现在OpenLDAP支持一个更广泛的复制拓扑, 关于提供者和消费者的以下这些条件已经不推荐了: 一个提供者复制目录更新到消费者; 消费者从提供者接收复制更新. 不像僵化定义的主/从关系,提供者/消费者角色更加的流动化:一个接收复制更新的消费者可能传递给其它服务器的另一个消费者,所以一个消费者也可以同时成为一个提供者。而且,消费者不需要成为一个实际上的LDAP服务器;它也可以仅仅是一个LDAP客户端。
以下章节将描述复制技术和讨论各种可用的复制选项.
复制技术
LDAP同步复制
LDAP同步复制引擎, 简称syncrepl, 是一个消费方的复制引擎,能让消费者服务器维护一个抽取片断的影子副本. 一个syncrepl引擎以slapd的一个线程的方式驻留在消费者那里. 它建立和维护一个消费者复制,方法是连接一个复制提供者去执行初始化DIT内容载荷以及接下来的定期的内容拉取或及时根据内容变更来更新。
Syncrepl 使用LDAP内容同步协议(或简称 LDAP Sync) 作为复制同步协议. LDAP Sync 提供一个有状态的复制,它同时支持拉模式和推模式同步并且不要求使用历史存储. 在拉模式复制下消费者定期拉提供者服务器的内容来更新. 在推模式复制下消费者监听提供者实时发送的更新. 因为协议不要求历史存储, 提供者不需要维护任何它接收到的更新的日志. (注意syncrepl引擎是可扩展的,并支持未来新增的复制协议.)
Syncrepl通过维护和交换同步cookies来保持对复制内容的状态的跟踪. 因为syncrepl消费者和提供者维护它们的内容状态, 消费者可以拉取提供者的内容来执行增量同步,只要请求那些最新的提供者内容条目。 Syncrepl也通过维护复制状态方便了复制的管理. 消费者复制可以在任何同步状态下从一个消费方或一个提供方的备份来构建. Syncrepl能自动重新同步消费者复制到和当前的提供者内容一致的最新状态.
Syncrepl同时支持拉模式和推模式同步. 在它的基本的 refreshOnly 同步模式下, 提供者使用基于拉模式的同步,这里消费者服务器不需要被跟踪并且不维护历史信息. 需要提供者处理的定期的拉请求信息,包含在请求本身的同步cookie里面。为了优化基于拉模式的同步, syncrepl把LDAP同步协议的当前阶段当成它的删除阶段一样处理, 而不是频繁地回滚完全重载. 为了更好地优化基于拉模式的同步, 提供者可以维护一个按范围划分的会话日志作为历史存储. 在它的 refreshAndPersist 同步模式, 提供者使用基于推模式的同步. 提供者维护对请求了一个持久性搜索的消费者服务器的跟踪,并且当提供者复制内容修改的时候向它们发送必要的更新.
有了syncrepl, 如果消费者服务器有对被复制的DIT片断的适当的操作权限,一个消费者服务器可以建立一个复制而不修改提供者的配置并且不需要重新启动提供者服务器. 消费者服务器可以停止复制,也不需要提供方的任何变更和重启.
Syncrepl支持局部的,稀疏的和片断复制. 影子DIT片断由一个标准通用搜索来定义,包括基础,范围,过滤条件,和属性列表. 复制内容也受限于syncrepl复制连接的绑定用户的操作权限.
LDAP内容同步协议
The LDAP Sync protocol allows a client to maintain a synchronized copy of a DIT fragment. The LDAP Sync operation is defined as a set of controls and other protocol elements which extend the LDAP search operation. This section introduces the LDAP Content Sync protocol only briefly. For more information, refer to RFC4533.
The LDAP Sync protocol supports both polling and listening for changes by defining two respective synchronization operations: refreshOnly and refreshAndPersist. Polling is implemented by the refreshOnly operation. The consumer polls the provider using an LDAP Search request with an LDAP Sync control attached. The consumer copy is synchronized to the provider copy at the time of polling using the information returned in the search. The provider finishes the search operation by returning SearchResultDone at the end of the search operation as in the normal search. Listening is implemented by the refreshAndPersist operation. As the name implies, it begins with a search, like refreshOnly. Instead of finishing the search after returning all entries currently matching the search criteria, the synchronization search remains persistent in the provider. Subsequent updates to the synchronization content in the provider cause additional entry updates to be sent to the consumer.
The refreshOnly operation and the refresh stage of the refreshAndPersist operation can be performed with a present phase or a delete phase.
In the present phase, the provider sends the consumer the entries updated within the search scope since the last synchronization. The provider sends all requested attributes, be they changed or not, of the updated entries. For each unchanged entry which remains in the scope, the provider sends a present message consisting only of the name of the entry and the synchronization control representing state present. The present message does not contain any attributes of the entry. After the consumer receives all update and present entries, it can reliably determine the new consumer copy by adding the entries added to the provider, by replacing the entries modified at the provider, and by deleting entries in the consumer copy which have not been updated nor specified as being present at the provider.
The transmission of the updated entries in the delete phase is the same as in the present phase. The provider sends all the requested attributes of the entries updated within the search scope since the last synchronization to the consumer. In the delete phase, however, the provider sends a delete message for each entry deleted from the search scope, instead of sending present messages. The delete message consists only of the name of the entry and the synchronization control representing state delete. The new consumer copy can be determined by adding, modifying, and removing entries according to the synchronization control attached to the SearchResultEntry message.
In the case that the LDAP Sync provider maintains a history store and can determine which entries are scoped out of the consumer copy since the last synchronization time, the provider can use the delete phase. If the provider does not maintain any history store, cannot determine the scoped-out entries from the history store, or the history store does not cover the outdated synchronization state of the consumer, the provider should use the present phase. The use of the present phase is much more efficient than a full content reload in terms of the synchronization traffic. To reduce the synchronization traffic further, the LDAP Sync protocol also provides several optimizations such as the transmission of the normalized entryUUIDs and the transmission of multiple entryUUIDs in a single syncIdSet message.
At the end of the refreshOnly synchronization, the provider sends a synchronization cookie to the consumer as a state indicator of the consumer copy after the synchronization is completed. The consumer will present the received cookie when it requests the next incremental synchronization to the provider.
When refreshAndPersist synchronization is used, the provider sends a synchronization cookie at the end of the refresh stage by sending a Sync Info message with refreshDone=TRUE. It also sends a synchronization cookie by attaching it to SearchResultEntry messages generated in the persist stage of the synchronization search. During the persist stage, the provider can also send a Sync Info message containing the synchronization cookie at any time the provider wants to update the consumer-side state indicator.
In the LDAP Sync protocol, entries are uniquely identified by the entryUUID attribute value. It can function as a reliable identifier of the entry. The DN of the entry, on the other hand, can be changed over time and hence cannot be considered as the reliable identifier. The entryUUID is attached to each SearchResultEntry or SearchResultReference as a part of the synchronization control.
Syncrepl细节
syncrepl引擎同时使用LDAP同步协议的refreshOnly和refreshAndPersist操作. 如果一个syncrepl规范存在于一个数据库定义中, slapd(8) 以一个 slapd(8) 线程的方式启动一个syncrepl引擎并规划它的执行时间表. 如果指定了refreshOnly操作, syncrepl引擎在一个同步操作完成之后将按间隔时间重新排程. 如果指定了refreshAndPersist操作, 引擎将保持激活并从提供者服务器处理持久性同步消息.
syncrepl引擎同时应用刷新同步的当前阶段和删除阶段. 可以在提供者服务器配置一个会话日志存储一定数量的从数据库中删除的entryUUIDs。多复制共享相同的会话日志. 如果会话日志是当前的并且消费者服务器足够新以至于在客户端的最后一次同步之后没有会话日志条目被删除,那么syncrepl引擎使用删除阶段. 如果没有为复制内容配置会话日志或如果消费者复制太陈旧而无法被会话日志涵盖到, syncrepl引擎使用当前阶段. 目前会话日志存储的设计是基于内存的, 所以包含在会话日志的信息相对多提供者的调用不是持久性的. 目前它不支持通过使用LDAP操作来操作会话日志存储. 它目前也不支持对会话日志施加访问控制.
作为进一步的优化, 甚至同步搜索都不和任何会话日志关联, 当没有发生复制相关的更新时将不会有任何条目传输给消费者.
syncrepl引擎, 是一个消费方的复制引擎, 可以工作在任何后端. LDAP同步提供者可以在任何后端配置成一个 overlay , 但是最好工作在 back-bdb 或 back-hdb 后端.
LDAP同步提供者为每一个数据库维护一个 contextCSN 作为提供者内容的当前同步状态指标. 它是提供者范围的最大 entryCSN,所以对于更小的拥有悬而未决的entryCSN值的条目来说不存在事务. contextCSN不能只是设成最大的已发表的entryCSN,因为 entryCSN 是在一个事务开始之前获得的并且事务还未提交到发表序列.
提供者在context suffix 条目的 contextCSN 属性存储 上下文的contextCSN . 这个属性不是在每个更新操作之后写入数据库; 而是主要在内存中维护. 在数据库启动时间提供者读取最后一次存储的 contextCSN 到内存里并且此后就只使用内存内的拷贝. 缺省的, 对 contextCSN 的变更作为一个数据库更新的结果将不写入数据库,直到服务器完全干净地关机. 如果需要的话,设置一个检查点可以让contextCSN写出得更频繁一些.
注意在启动的时间, 如果提供者不能从suffix条目读取一个 contextCSN , 它将扫描整个数据库来决定它的值, 并且在一个大的数据库中扫描可能要花很长时间. 当一个 contextCSN 值被读取, 这个数据库将仍被扫描用于任何高于它的 entryCSN 值, 以确保 contextCSN 值真的反应了数据库中entryCSN的最大提交 . 在支持不等式索引的数据库中, 在 entryCSN 属性上设置一个 eq 索引并配置 contextCSN 检查点,将极大地加速这个扫描步骤.
如果通过读取和扫描数据库没有决定 contextCSN, 一个新的值将被生成. 而且, 如果扫描数据库产生了一个比之前纪录在suffix条目中的contextCSN属性更大的entryCSN,一个检查点将立刻写入新的值.
消费者也存储它的复制状态, 它是作为一个同步cookie接收的提供者的contextCSN, 在suffix条目的contextCSN属性. 当它执行对提供者服务器的顺序增量同步时,由一个消费者服务器维护的复制状态被用作同步状态指标. 当它在一个级联复制配置中承当一个第二提供者服务器时,它也被用作提供方的同步状态指标. 因为消费者和提供者状态信息是在它们各自的服务器的同一个地方维护的, 任何消费者可以被提拔成为提供者(反之亦然)而不需要任何特别的动作.
因为在syncrepl规范中可能使用一个通用搜索过滤器, 上下文中的一些条目可能被从同步内容中省略了. syncrepl引擎建立一个粘条目来填充复制上下文中的窟窿,如果复制内容的任何部分属于这个窟窿的话。 这些粘条目在搜索结果中将不返回,除非提供了ManageDsaIT控制。
另外,作为在syncrepl规范使用搜索过滤器的结果, 可能会有类似这样的修改,即从复制范围移除一个条目,即使提供者上的条目还没有被删除。逻辑上这个条目必须在消费者服务器被删除但是在refreshOnly模式下,如果没有会话日志则提供者无法检测和传播这个变更.
关于配置,参见 Syncrepl 节.
部署替代
LDAP同步协议只对复制规定了狭窄的范围, OpenLDAP实现则是极为弹性的并且支持各种操作模式以处理协议中未显式地提出的其他情景.
Delta-syncrepl复制
- LDAP同步复制的缺点:
LDAP同步复制是一个基于对象的复制机制. 当提供者的一个被复制对象中的任何属性值改变时, 每个消费者在复制过程中撷取并处理完整的变更对象, 包括所有改变和没改变的属性值. 这方法的一个好处是当多个变更发生在单一对象上时, 那些变更的精确顺序不需要保存; 只有最终状态是有意义的. 但是当使用模式(匹配的方式)在一次变更中处理很多对象时,这个方法可能有缺点。
例如, 假设你有一个数据库包含 100,000 对象,每个对象是 1 KB . 进一步, 假设你经常运行一个批处理工作来变更主服务器上的 100,000 对象的每一个对象中的一个两字节的属性值. 不算LDAP和TCP/IP协议的开销, 每次你运行这个工作每个消费者将传送并处理 1 GB 的数据,只是为了处理这个 200KB 的变更!
在类似这样的案例中,99.98% 被传送和处理的数据将是多余的, 因为它们代表那些未变更的值. 这是一个对宝贵的传输和处理带宽的浪费并且可能导致发展出不可接受的复制日志的积压. 虽然这个情形是一个极端, 但它有助于演示某些LDAP部署的一个非常真实的问题.
- 看看Delta-syncrepl怎么处理:
Delta-syncrepl, 一个基于变更日志syncrepl变种, 被设计用来处理类似上面所说的情况. Delta-syncrepl通过在提供者一端维护一个可选择深度的变更日志来起作用. 复制消费者为它需要的变更检查这个变更日志,只要变更日志包含它需要的变更,消费者就从变更日志撷取这些变更并把它们应用到自己的数据库. 不过,一个复制(译者注:指变更日志里的变更)如果离上一次同步的状态太远(或消费者根本就是空的), 可以用常规的syncrepl把它(指消费者)恢复到最新的状态然后复制重新切换到delta-syncrepl模式.
关于配置请参考 Delta-syncrepl 章节.
N-Way Multi-Master复制
Multi-Master复制是一个使用Syncrepl复制数据到多个提供者(“主服务器”)目录服务器的复制技术.
对于Multi-Master replication有效的观点
- 如果任何提供者失败了, 其他提供者将继续接受更新
- 避免了单点失败
- 提供者们可以在不同的物理位置例如跨越全球网络.
- 好的自动容错/高可用性
对于Multi-Master replication无效的观点
(这些经常被声称是Multi-Master复制的优点但是那些说法是错误的):
- 它不关负载均衡任何事
- 提供者必须对所有其他的服务器进行写操作,这意味着分布在所有的服务器上的网络交通和写操作负载,和单一主服务器是一样的。
- 多服务器的服务器利用率和负载在最好的情况下和单服务器一样; 最坏的情况下单服务器更优,因为在提供者和消费者之间使用不同的模式的时候索引可以做出不同的优化调整.
和Multi-Master replication抵触的观点
- 打破了目录模式的数据一致性的保障
- http://www.openldap.org/faq/data/cache/1240.html
- 如果提供者的连接因为网络问题丢失了, 那么 "自动容错" 只会使问题复杂化
- 通常, 一个特定的机器不能区分失去和一个节点的联系是因为该节点崩溃了还是因为网络连接失败了a
- 如果一个网络是分割开的而多个客户端开始向每一个"主服务器"写操作,那么和解将是一个痛苦; 可能最好的办法是禁止那些被单一提供者分隔开的客户端的写操作
关于配置,请看下面的 N-Way Multi-Master 章节
MirrorMode复制
MirrorMode是一个混合配置,既提供单主服务器复制的所有一致性保障,也提供多主服务器模式的高可用性. 在 MirrorMode 两个提供者都被设置成从对方复制(就象一个多主服务器配置), 但是一个额外的前段被用来引导所有的写操作到仅仅到两台服务器中的其中一台. 第二个提供者将只在第一台服务器崩溃时进行写操作, 那时这个前端将切换路径引导所有的写操作到第二个提供者. 当一个崩溃的提供者被修复并且重启动后将自动从正在运行的提供者那里活得任何更新并重新同步.
MirrorMode的观点
- 对于目录的写操作提供了一个高可用性 (HA) 方案(复制处理读操作)
- 只有一个提供者是可操作的l, 写操作的安全是可接受的
- 提供者节点从对方互相复制, 所以它们总是最新的并且可以随时准备好接管 (热备份)
- Syncrepl也允许提供者节点在任何停机时间进行重新同步
和MirrorMode抵触的观点
- MirrorMode 不能被称为多主机方案. 这是因为同一时间写操作不得不仅限于镜像节点中的一个
- MirrorMode 可被称为Active-Active Hot-Standby(“双活热备份”,呃,这个翻译怎么样,传神不?), 因此需要一个额外的服务器(代理模式的slapd)或设备(硬件负载平衡装置)来管理哪个提供者是当前激活的
- 备份的管理稍微不同
- 如果备份bdb本身并且定期备份事务日志文件,那么镜像对的相同数字需要用于收集日志文件直到下一次数据库备份发生
- 为了确保所有数据库都是一致的, 当执行一个slapcat的时候每个数据库可能都不得不置于只读模式.
- Delta-Syncrepl扔不支持
关于配置,请看下面的 MirrorMode 章节
Syncrepl代理模式
因为LDAP同步协议同时支持基于“拉”和“推”的复制, “推”模式 (refreshAndPersist) 在提供者开始"推"变更之前仍必须由消费者初始化. 在一些网络配置中, 特别是防火墙限制了连接的方向时, 一个提供者初始化的推模式是需要的.
这个模式可以被配置成LDAP Backend (Backends and slapd-ldap(8)). 不用在实际的消费者服务器上运行syncrepl引擎, 而是一个slapd-ldap代理设置在靠近(或搭配在)提供者的地方指向消费者, 而这个syncrepl引擎运行在这个代理服务器上.
关于配置, 请看 Syncrepl代理 章节.
替代Slurpd
旧的slurpd机制只操作主服务器初始化的推模式. Slurpd复制被Syncrepl复制取代了并且在OpenLDAP 2.4中被完全移除了.
slurpd守护进程是原来继承自UMich's LDAP的复制机制并且以推模式操作: 主服务器推变更到从服务器. 因为多种原因它被替换掉, 简短的说:
- 它是不可靠的
- 它对replog中的记录的次序极为敏感
- 它可能很容易失去同步, 这时需要手工干预来从主目录重新同步从服务器数据库
- 它对不可用的服务器不是非常宽容. 如果一个从服务器长时间停机, replog可能变得太大以至于slurpd无法处理
- 它只工作在推模式
- 它需要停止和重新启动主服务器来增加从服务器
- 它只支持单一主服务器复制
- 它是不可靠的
Syncrepl没有那些弱点:
- Syncrepl是自同步的; 你可以在任何状态启动一个消费者数据库,从完全空的到完全同步的,它将自动做正确的事来完成和维护同步
- 它对变更发生的次序完全不敏感
- 它保障消费者和提供者内容的合流,不用手工干预
- 无论一个消费者多长时间没有联系提供者,它都能重新同步
- Syncrepl能双向操作
- 消费者能在不用碰提供者的情况下被加入
- 支持多主服务器复制
- Syncrepl是自同步的; 你可以在任何状态启动一个消费者数据库,从完全空的到完全同步的,它将自动做正确的事来完成和维护同步
配置不同的复制类型
Syncrepl
Syncrepl配置
因为syncrepl是一个消费方的复制引擎, syncrepl规范定义在 slapd.conf(5) 的消费者服务器, 而不是在提供者的服务器配置文件里. 复制内容的初始化装载可以有两种执行方式,以无同步cookie的方式启动一个syncrepl 引擎,或装载一个提供者服务器的全备份LDIF文件填充到消费者服务器.
当从一个备份装载的时候, 它不需要执行从提供者内容的最新备份初始化装载这个动作. syncrepl引擎将自动同步初始化的消费者复制当前的提供者内容. 结果是, 它不需要为了避免由于内容备份和装载过程中提供者服务器仍在更新而导致复制不一致的问题来停止提供者服务器.
当复制一个大规模的目录时, 特别是在一个带宽受限的环境, 建议从备份装载消费者而不是使用syncrepl执行一个完全的初始化装载.
设置提供者的slapd
提供者被实现为一个 overlay, 所以这个 overlay 本身在使用之前必须首先如 slapd.conf(5) 配置. 提供者只有两个配置指示, 在 contextCSN 上设定检查点和配置会话日志. 因为 LDAP 同步搜索受限于访问控制, 应为复制的内容设置正确的访问控制权限.
contextCSN检查点设置如下
syncprov-checkpoint <ops> <minutes>
检查点只在成功的写操作之后测试. 如果 <ops> 操作了或从上次检查点到现在超过了 <minutes> 时间, 将执行一个新的检查点.
会话日志设置如下
syncprov-sessionlog <size>
这里 <size> 是会话日志可以记录的条目的最大数量. 当一个会话日志被配置好, 它就自动用于所有对此数据库的 LDAP 同步搜索.
注意使用会话日志需要搜索 entryUUID 属性. 在这个属性上设一个 eq 索引将极有益于提供者服务器的会话日志的性能.
slapd.conf(5)中一个更复杂的例子内容如下:
        database bdb
        suffix dc=Example,dc=com
        rootdn dc=Example,dc=com
        directory /var/ldap/db
        index objectclass,entryCSN,entryUUID eq

        overlay syncprov
        syncprov-checkpoint 100 10
        syncprov-sessionlog 100
设置消费者的slapd
在 slapd.conf(5) 的replica范围的数据库一节定义了syncrepl复制. syncrepl引擎是独立的后端并且可以使用任何数据库类型定义directive.
        database hdb
        suffix dc=Example,dc=com
        rootdn dc=Example,dc=com
        directory /var/ldap/db
        index objectclass,entryCSN,entryUUID eq

        syncrepl rid=123
                provider=ldap://provider.example.com:389
                type=refreshOnly
                interval=01:00:00:00
                searchbase="dc=example,dc=com"
                filter="(objectClass=organizationalPerson)"
                scope=sub
                attrs="cn,sn,ou,telephoneNumber,title,l"
                schemachecking=off
                bindmethod=simple
                binddn="cn=syncuser,dc=example,dc=com"
                credentials=secret
在这个例子中, 消费者将从ldap://provider.example.com的389端口连接到提供者 slapd(8) 来执行每天一次同步的拉操作(refreshOnly)模式. 它将以 cn=syncuser,dc=example,dc=com 绑定,以密码"secret"进行简单验证. 注意要在提供者服务器为cn=syncuser,dc=example,dc=com设置适当的访问控制权限以接收想要的复制内容. 另外提供者上的搜索限制必须足够高以允许同步用户接收请求内容完整的拷贝. 消费者使用 rootdn 写入它的数据库所以它总是有全部的权限来写所有的内容.
在上面的例子中同步搜索将在dc=example,dc=com的整个子树搜索 objectClass 是 organizationalPerson 的条目. 请求的属性是 cn, sn, ou, telephoneNumber, title, 和 l. schema 检查被关闭,这样当处理从提供者slapd(8)来的更新时消费者 slapd(8) 将不会强制对条目进行 schema 检查.
更多的详细信息参见 syncrepl 指示, 见本管理指南的slapd配置文件的syncrepl节.
启动提供者和消费者的slapd
提供者slapd(8)不需要重启. contextCSN将会根据需要自动生成: 它可能原来就包含在 LDIF 文件里, 由 slapadd (8) 生成, 在上下文中通过变更生成, 或当第一次 LDAP 同步搜索到达提供者时生成. 如果装载了一个之前不包含contextCSN的LDIF 文件, slapadd (8) 应使用 -w 选项来令它生成. 这将使服务器第一次运行时变得快一点.
当启动一个消费者 slapd(8) 时, 为了从一个特定的状态开始同步,它可能使用命令行参数 -c 即cookie选项,以提供一个同步cookie. cookie是一个逗号分隔的name=value对的列表. 目前支持的 syncrepl cookie 字段是 csn=<csn> 和 rid=<rid>. <csn>代表消费者复制的当前同步状态. <rid> 标识这个消费者服务器的一个本地消费者复制. 它用于把cookie关联到slapd.conf(5)中拥有匹配的复制标识的 syncrepl 定义. <rid>必须超过三位数. 命令行cookie会覆盖存储在消费者复制数据库中的同步cookie.
Delta-syncrepl
Delta-syncrepl提供者配置
设置 delta-syncrepl 需要同时改变主服务器和复制服务器的配置:
     # 给予复制DN无限的读权限.  这个 ACL 需要和其他
     # ACL 声明合并, 并且/或者在数据库范围内移动
     # "by * break" 部分会执行随后的规则
     # 细节请看 slapd.access(5) .
     access to *
        by dn.base="cn=replicator,dc=symas,dc=com" read
        by * break

     # 设置模块路径
     modulepath /opt/symas/lib/openldap

     # 装载 hdb 后端
     moduleload back_hdb.la

     # 装载操作日志 overlay
     moduleload accesslog.la

     #装载 syncprov overlay
     moduleload syncprov.la

     # 操作日志数据库定义
     database hdb
     suffix cn=accesslog
     directory /db/accesslog
     rootdn cn=accesslog
     index default eq
     index entryCSN,objectClass,reqEnd,reqResult,reqStart

     overlay syncprov
     syncprov-nopresent TRUE
     syncprov-reloadhint TRUE

     # 让复制 DN 有无限的搜索权限
     limits dn.exact="cn=replicator,dc=symas,dc=com" time.soft=unlimited time.hard=unlimited size.soft=unlimited size.hard=unlimited

     # 主数据库定义
     database hdb
     suffix "dc=symas,dc=com"
     rootdn "cn=manager,dc=symas,dc=com"

     ## 任何期望的其他配置选项

     # syncprov 特别索引
     index entryCSN eq
     index entryUUID eq

     # 主数据库的syncrepl提供者
     overlay syncprov
     syncprov-checkpoint 1000 60

     # 主数据库的操作日志overlay定义
     overlay accesslog
     logdb cn=accesslog
     logops writes
     logsuccess TRUE
     # 每天扫描一次操作日志数据库, 并清除7天前的条目
     logpurge 07+00:00 01+00:00

     # 让复制DN有无限搜索权限
     limits dn.exact="cn=replicator,dc=symas,dc=com" time.soft=unlimited time.hard=unlimited size.soft=unlimited size.hard=unlimited
更多信息, 访问(slapo-accesslog(5) 和 slapd.conf(5))相关的 man 页
Delta-syncrepl消费者配置
     # 复制数据库配置
     database hdb
     suffix "dc=symas,dc=com"
     rootdn "cn=manager,dc=symas,dc=com"

     ## 任何关于复制的其他配置, 例如你期望的索引
     ##

     # syncrepl特有的索引
     index entryUUID eq

     # syncrepl参数
     syncrepl  rid=0
               provider=ldap://ldapmaster.symas.com:389
               bindmethod=simple
               binddn="cn=replicator,dc=symas,dc=com"
               credentials=secret
               searchbase="dc=symas,dc=com"
               logbase="cn=accesslog"
               logfilter="(&(objectClass=auditWriteObject)(reqResult=0))"
               schemachecking=on
               type=refreshAndPersist
               retry="60 +"
               syncdata=accesslog

     # 提交更新到主服务器
     updateref               ldap://ldapmaster.symas.com
以上配置假定你在你用于绑定到提供者的数据库中有一个复制者标识. 另外, 所有数据库 (主数据库, 复制数据库, 以及操作日志存储数据库) 也应该正确调整 DB_CONFIG 文件以满足你的需要.
N-Way Multi-Master
以下例子将使用三个主节点. Keeping in line with test050-syncrepl-multimaster of the OpenLDAP test suite, 我们将通过cn=config配置slapd(8)
这里设置配置数据库:
     dn: cn=config
     objectClass: olcGlobal
     cn: config
     olcServerID: 1

     dn: olcDatabase={0}config,cn=config
     objectClass: olcDatabaseConfig
     olcDatabase: {0}config
     olcRootPW: secret
第二和第三服务器明显会有一个不同的 olcServerID:
     dn: cn=config
     objectClass: olcGlobal
     cn: config
     olcServerID: 2

     dn: olcDatabase={0}config,cn=config
     objectClass: olcDatabaseConfig
     olcDatabase: {0}config
     olcRootPW: secret
这里设置 syncrepl 为提供者 (因为这些都是主服务器):
     dn: cn=module,cn=config
     objectClass: olcModuleList
     cn: module
     olcModulePath: /usr/local/libexec/openldap
     olcModuleLoad: syncprov.la
现在我们设置第一个主节点 (使用你自己的确切的urls替换掉 $URI1, $URI2 和 $URI3 等.):
     dn: cn=config
     changetype: modify
     replace: olcServerID
     olcServerID: 1 $URI1
     olcServerID: 2 $URI2
     olcServerID: 3 $URI3

     dn: olcOverlay=syncprov,olcDatabase={0}config,cn=config
     changetype: add
     objectClass: olcOverlayConfig
     objectClass: olcSyncProvConfig
     olcOverlay: syncprov

     dn: olcDatabase={0}config,cn=config
     changetype: modify
     add: olcSyncRepl
     olcSyncRepl: rid=001 provider=$URI1 binddn="cn=config" bindmethod=simple
       credentials=secret searchbase="cn=config" type=refreshAndPersist
       retry="5 5 300 5" timeout=1
     olcSyncRepl: rid=002 provider=$URI2 binddn="cn=config" bindmethod=simple
       credentials=secret searchbase="cn=config" type=refreshAndPersist
       retry="5 5 300 5" timeout=1
     olcSyncRepl: rid=003 provider=$URI3 binddn="cn=config" bindmethod=simple
       credentials=secret searchbase="cn=config" type=refreshAndPersist
       retry="5 5 300 5" timeout=1
     -
     add: olcMirrorMode
     olcMirrorMode: TRUE
现在启动主服务器和一个或多个消费者服务器, 也把上面的 LDIF 加入到第一个消费者, 第二个消费者等等. 然后它将复制cn=config. 你现在就在config数据库上拥有了多路多主机.
我们仍不得不复制实际的数据, 而不仅是 config, 所以添加下面这些到主服务器(所有激活的和配置好的消费者/主服务器将领取这个配置, 因为他们都是在同步的). 同样的, 以任何对你的安装可用的设置替换所有 ${} 变量:
     dn: olcDatabase={1}$BACKEND,cn=config
     objectClass: olcDatabaseConfig
     objectClass: olc${BACKEND}Config
     olcDatabase: {1}$BACKEND
     olcSuffix: $BASEDN
     olcDbDirectory: ./db
     olcRootDN: $MANAGERDN
     olcRootPW: $PASSWD
     olcLimits: dn.exact="$MANAGERDN" time.soft=unlimited time.hard=unlimited size.soft=unlimited size.hard=unlimited
     olcSyncRepl: rid=004 provider=$URI1 binddn="$MANAGERDN" bindmethod=simple
       credentials=$PASSWD searchbase="$BASEDN" type=refreshOnly
       interval=00:00:00:10 retry="5 5 300 5" timeout=1
     olcSyncRepl: rid=005 provider=$URI2 binddn="$MANAGERDN" bindmethod=simple
       credentials=$PASSWD searchbase="$BASEDN" type=refreshOnly
       interval=00:00:00:10 retry="5 5 300 5" timeout=1
     olcSyncRepl: rid=006 provider=$URI3 binddn="$MANAGERDN" bindmethod=simple
       credentials=$PASSWD searchbase="$BASEDN" type=refreshOnly
       interval=00:00:00:10 retry="5 5 300 5" timeout=1
     olcMirrorMode: TRUE

     dn: olcOverlay=syncprov,olcDatabase={1}${BACKEND},cn=config
     changetype: add
     objectClass: olcOverlayConfig
     objectClass: olcSyncProvConfig
     olcOverlay: syncprov
注意: 你的所有服务器始终必须使用例如 NTP http://www.ntp.org/, 原子钟, 或一些其他可用的时间参照物紧紧同步.
注意: 如slapd-config(5)指出的, 在 olcSyncRepl 指示中定义的 URLs 是从它们那里复制的服务器的 URLs. 这些必须准确地匹配 slapd 监听(命令行参数选项的 -h )的URLs . 否则 slapd 可能尝试从它自身复制, 而导致循环.
MirrorMode
镜像模式配置实际上非常容易. 如果你已经配置了一个普通的 slapd syncrepl 提供者, 那么唯一的改变就是以下两个参数:
       mirrormode  on
       serverID    1
注意: 你需要确保每个镜像的serverID是不同的并且把它作为一个全球配置选项.
Mirror Node配置
第一步是配置syncrepl提供者,就像 配置提供者slapd 一节写的那样.
注意: Delta-syncrepl还不支持镜像模式.
这里是从一个在refreshAndPersist模式下使用LDAP同步复制的例子中截取的片断:
镜像模式节点 1:
       # 全球部分
       serverID    1
       # 数据库部分

       # syncrepl参数
       syncrepl      rid=001
                     provider=ldap://ldap-sid2.example.com
                     bindmethod=simple
                     binddn="cn=mirrormode,dc=example,dc=com"
                     credentials=mirrormode
                     searchbase="dc=example,dc=com"
                     schemachecking=on
                     type=refreshAndPersist
                     retry="60 +"

       mirrormode on
镜像模式节点 2:
       # 全球部分
       serverID    2
       # 数据库部分

       # syncrepl参数
       syncrepl      rid=001
                     provider=ldap://ldap-sid1.example.com
                     bindmethod=simple
                     binddn="cn=mirrormode,dc=example,dc=com"
                     credentials=mirrormode
                     searchbase="dc=example,dc=com"
                     schemachecking=on
                     type=refreshAndPersist
                     retry="60 +"

       mirrormode on
它真的很简单; 每个镜像模式节点设置得完全一样, 除了 serverID 是唯一的, 并且每个消费者都被指向另一个服务器.
容错配置
这通常有两个选择; 1. 硬件代理/负载均衡 或 专用的代理软件, 2. 使用一个 Back-LDAP 代理作为一个 syncrepl 提供者
一个典型的企业例子可能是:
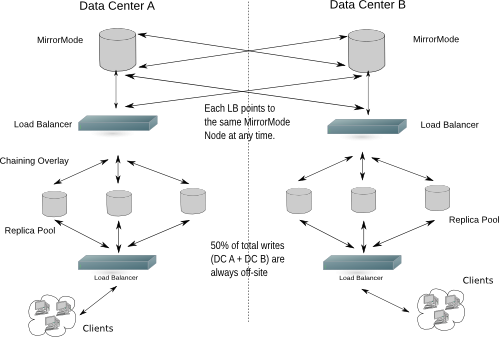
图 X.Y: 在一个双数据中心配置中使用镜像模式
标准消费者配置
这和设置消费者slapd一节完全一样. 可以设置一个普通的复制模式, 也可以使用 delta-syncrepl 复制模式.
MirrorMode总结
现在你将有一个目录架构提供单主服务器复制的全部一致性保障, 同时也提供多主服务器复制的高可用性.
Syncrepl代理
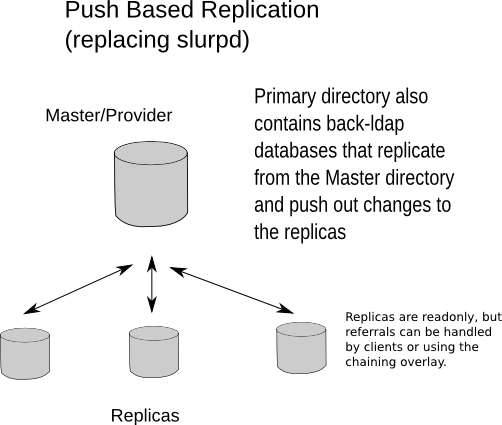
图片 X.Y: 取代slurpd
以下例子是一个自包含的推模式复制方案:
        #######################################################################
        # 标准 OpenLDAP 主/提供者(服务器)
        #######################################################################

        include     /usr/local/etc/openldap/schema/core.schema
        include     /usr/local/etc/openldap/schema/cosine.schema
        include     /usr/local/etc/openldap/schema/nis.schema
        include     /usr/local/etc/openldap/schema/inetorgperson.schema

        include     /usr/local/etc/openldap/slapd.acl

        modulepath  /usr/local/libexec/openldap
        moduleload  back_hdb.la
        moduleload  syncprov.la
        moduleload  back_monitor.la
        moduleload  back_ldap.la

        pidfile     /usr/local/var/slapd.pid
        argsfile    /usr/local/var/slapd.args

        loglevel    sync stats

        database    hdb
        suffix      "dc=suretecsystems,dc=com"
        directory   /usr/local/var/openldap-data

        checkpoint      1024 5
        cachesize       10000
        idlcachesize    10000

        index       objectClass eq
        # 其它索引
        index       default     sub

        rootdn          "cn=admin,dc=suretecsystems,dc=com"
        rootpw          testing

        # syncprov特有的索引
        index entryCSN eq
        index entryUUID eq

        # 主数据库的syncrepl 提供者
        overlay syncprov
        syncprov-checkpoint 1000 60

        # 让复制DN 有无限的搜索权限
        limits dn.exact="cn=replicator,dc=suretecsystems,dc=com" time.soft=unlimited time.hard=unlimited size.soft=unlimited size.hard=unlimited

        database    monitor

        database    config
        rootpw          testing

        ##############################################################################
        # 消费者代理,它通过Syncrepl拉数据并且通过slapd-ldap推数据
        ##############################################################################

        database        ldap
        # 忽略其他数据库的冲突, 因为我们需要推同样的后缀
        hidden              on
        suffix          "dc=suretecsystems,dc=com"
        rootdn          "cn=slapd-ldap"
        uri             ldap://localhost:9012/

        lastmod         on

        # 我们不需要对这个DSA做任何操作
        restrict        all

        acl-bind        bindmethod=simple
                        binddn="cn=replicator,dc=suretecsystems,dc=com"
                        credentials=testing

        syncrepl        rid=001
                        provider=ldap://localhost:9011/
                        binddn="cn=replicator,dc=suretecsystems,dc=com"
                        bindmethod=simple
                        credentials=testing
                        searchbase="dc=suretecsystems,dc=com"
                        type=refreshAndPersist
                        retry="5 5 300 5"

        overlay         syncprov
这种类型的一个复制配置可能是这样的:
        #######################################################################
        # 标准 OpenLDAP 无 Syncrepl的从服务器
        #######################################################################

        include     /usr/local/etc/openldap/schema/core.schema
        include     /usr/local/etc/openldap/schema/cosine.schema
        include     /usr/local/etc/openldap/schema/nis.schema
        include     /usr/local/etc/openldap/schema/inetorgperson.schema

        include     /usr/local/etc/openldap/slapd.acl

        modulepath  /usr/local/libexec/openldap
        moduleload  back_hdb.la
        moduleload  syncprov.la
        moduleload  back_monitor.la
        moduleload  back_ldap.la

        pidfile     /usr/local/var/slapd.pid
        argsfile    /usr/local/var/slapd.args

        loglevel    sync stats

        database    hdb
        suffix      "dc=suretecsystems,dc=com"
        directory   /usr/local/var/openldap-slave/data

        checkpoint      1024 5
        cachesize       10000
        idlcachesize    10000

        index       objectClass eq
        # 其它索引
        index       default     sub

        rootdn          "cn=admin,dc=suretecsystems,dc=com"
        rootpw          testing

        # 让复制DN拥有无限的搜索权限
        limits dn.exact="cn=replicator,dc=suretecsystems,dc=com" time.soft=unlimited time.hard=unlimited size.soft=unlimited size.hard=unlimited

        updatedn "cn=replicator,dc=suretecsystems,dc=com"

        # 提交更新到主服务器
        updateref   ldap://localhost:9011

        database    monitor

        database    config
        rootpw          testing
你能看到我们在这里使用了 updatedn 参数,而它的示范 ACLs (usr/local/etc/openldap/slapd.acl) 可能如下:
        # 给复制DN无限的读权限.  这个ACL可能需要和其他ACL声明配合.
        #

        access to *
             by dn.base="cn=replicator,dc=suretecsystems,dc=com" write
             by * break

        access to dn.base=""
                by * read

        access to dn.base="cn=Subschema"
                by * read

        access to dn.subtree="cn=Monitor"
            by dn.exact="uid=admin,dc=suretecsystems,dc=com" write
            by users read
            by * none

        access to *
                by self write
                by * read
为了支持更多的复制, 只要加入更多的数据库 ldap 节并相应增加 syncrepl rid 号码.
注意: 你必须以相同的数据填充主目录和从目录, 而不是像使用普通Syncrepl时候那样
如果你没有修改主目录配置的权限,你可以配置一个独立的ldap代理, 它看起来像这样:
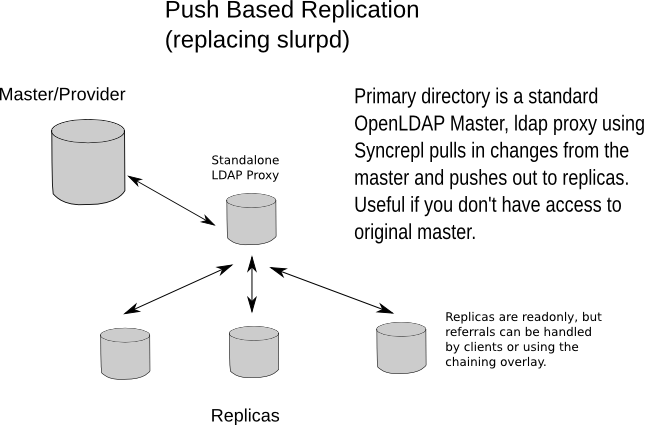
图片 X.Y: 以一个独立版本取代 slurpd
以下配置是一个独立的LDAP代理的配置示例:
        include     /usr/local/etc/openldap/schema/core.schema
        include     /usr/local/etc/openldap/schema/cosine.schema
        include     /usr/local/etc/openldap/schema/nis.schema
        include     /usr/local/etc/openldap/schema/inetorgperson.schema

        include     /usr/local/etc/openldap/slapd.acl

        modulepath  /usr/local/libexec/openldap
        moduleload  syncprov.la
        moduleload  back_ldap.la

        ##############################################################################
        # 消费者代理,通过Syncrepl拉数据并通过slapd-ldap推数据
        ##############################################################################

        database        ldap
        # ignore conflicts with other databases, as we need to push out to same suffix
        hidden              on
        suffix          "dc=suretecsystems,dc=com"
        rootdn          "cn=slapd-ldap"
        uri             ldap://localhost:9012/

        lastmod         on

        # 我们不需要对这个DSA做任何操作
        restrict        all

        acl-bind        bindmethod=simple
                        binddn="cn=replicator,dc=suretecsystems,dc=com"
                        credentials=testing

        syncrepl        rid=001
                        provider=ldap://localhost:9011/
                        binddn="cn=replicator,dc=suretecsystems,dc=com"
                        bindmethod=simple
                        credentials=testing
                        searchbase="dc=suretecsystems,dc=com"
                        type=refreshAndPersist
                        retry="5 5 300 5"

        overlay         syncprov
如你所见, 使用Syncrepl和slapd-ldap(8) 剪裁你的复制来满足你的特有的网络拓扑,你可以让自己的想象力变得很疯狂.